Blender 3D:零基础到专业级-单元2:基本建模和着色
Putting it all Together: A Dragon!
::一个龙!
I downloaded Blender without knowing much about how to use it, probably like you. I hunted around for a good tutorial and found this one. It is teaching me wonderful things! I have diligently followed every lesson from the beginning, as I hope you have. Every lesson seems to contain some valuable technique. So now it is time to put it all together into a single project.
::我下载了Blender,但并不知道如何使用它,可能和你一样. 我在搜索一个好的教程,找到了这个. 它教了我很多美好的事情! 我从一开始就认真地跟着每一个课程,我希望你也这样. 每个课程似乎都包含一些有价值的技术. 所以现在是时候把它全部放在一个单一的项目中了.
Hopefully, you now know
::希望你现在知道
-
How to add objects, move and rotate them, scale them in various dimensions, and change their shape.
::如何添加物体,移动和旋转它们, -
How to use proportional editing to change them even more.
::如何使用比例编辑来更改它们. -
How to parent, join and separate objects.
::如何将对象连接,分离. -
How to use materials and textures.
::如何使用材料和纹理. -
How to use images in materials.
::如何在材料中使用图像. -
How to use basic lights.
::如何使用基本灯. -
How to use modifiers including subsurf and array.
::如何使用包括下面和数组的修饰器. -
Basic use of curves
::曲线的基本使用 -
It will help if you know how to use a photo editor such as GIMP to produce seamless textures
::如果您知道如何使用GIMP等照片编辑器来生成无纹理,
This project will build on all that background. Since all those things have been covered before, this will not be a key-by-key tutorial but rather a description of the general steps to take to make the finished scene.
::由于这些事都已经被讨论过, 这不是一个关键的教程, 而是一个描述完成场景的一般步骤.
Modeling from the Image
::从图像中建模
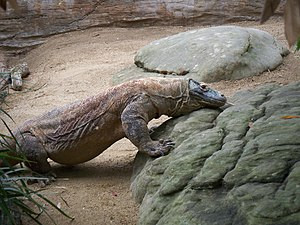
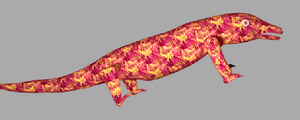
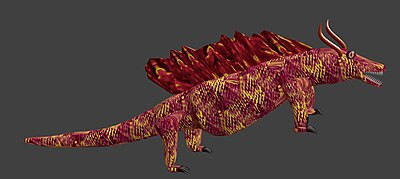
It happens that the Komodo Dragon is one of my favorite creatures. Let us start with that and let our imagination run wild. In the lesson on
Modeling a Fox from Guide Images
we learned how to make a beautiful 3 dimensional wolf from an image. (Yes, I know. The fox turned into a wolf. If you did that lesson you understand.) Here is a nice picture of a Komodo Dragon by wallygrom from
Creative Commons
with a proper license. We can then set that picture as a background image and apply the technique of starting with a cube and scaling it, extruding it, scaling again and so on. We only have one view, so our imagination and application of other pictures has to help with the top and end views, and we have to add a nice long tail. As you build your cubes keep in mind that you will have to create faces and extrude the legs so place a well sized face at the proper spot.
::刚好,科莫多龙是我最喜欢的生物之一.让我们从这个开始,让我们的想象力大放大.在"导游图片"的"模拟"课中,我们学到了如何从图片中制作一个美丽的3维狼. (是的,我知道.狐变成了狼.如果你做了这个课,你就明白了.) 这里是由Wallygrom从创意共享版获得适当许可的科莫多龙的漂亮图片.我们可以将图片作为背景图片,并使用从立方体开始并缩放,挤出,再次缩放等等的技术.我们只有一个视图,所以我们的想象力和其他图片的应用必须帮助顶部和视图,我们必须添加一个漂亮的长尾.当你记住你的立方体时,你必须建立
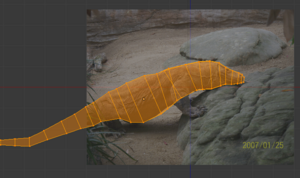
We will use the techniques we learned to split faces and add the legs. Be sure to provide a nice mouth to put teeth in later, and pay particular attention to modeling the claws. I modeled one entire foot and then duplicated it three times to have them all, and joined each one to the body at the appropriate spot.
::我们将使用我们学到的技术来分开脸部并加上腿部. 确保提供一个漂亮的嘴以后可以放牙,并特别注意模拟爪子. 我模拟了一个完整的脚,然后重复三次,以获得它们全部,并将每一个连接到身体的适当位置.
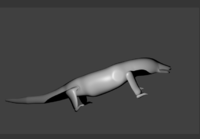
Once you have outlined the dragon with the cubes, remember what we learned in
Smoothing Your Simple Person
and apply subsurf modifier and smooth the entire thing. You can then push and pull on vertices to help make it look as good as possible. I wanted to try to maintain the look of an ordinary creature and stay close to my Komodo Dragon, rather than a huge fierce beast to take on St. George.
::现在,我们可以把它看成是个小小的小龙,用小小的子来形容它. 现在,我们可以把它看成是个小小龙,用小小的子来形容它.
Setting the Body Materials and Textures
::设置机身材料和纹理
Use what we learned in
Image Textures
to give the dragon his scales. The most used technique in this tutorial is:
::通过图像纹理的教学,让龙的尺度变得更大.
-
Search
Flicker Creative Commons
for a properly licensed picture that has a good material in it. If you use Google or some other search, be sure that the picture you get is properly licensed if you plan to share the image.
::搜索Flicker创意共享图片,以找到有良好的内容的正确授权图片.如果您使用谷歌或其他搜索,请确保您获得的图片是正确授权的,如果您计划分享图片. -
If your image is NOT a single seamless texture, use photo editing software (such as GIMP) to produce a usable seamless file.
-
Load the image into GIMP. Crop it to a reasonable size showing a relatively uniform texture.
::装入GIMP. 将图像剪成合理大小, -
Choose
Filters > Map > Make Seamless
. Other photo editors will usually have a similar operation.
::选择过器>地图>无.其他照片编辑器通常会有类似的操作. -
Save the image with a suitable file name.
::保存图像以一个合适的文件名.
::如果你的图像不是单个无纹理,使用照片编辑软件 (如GIMP) 产生一个可用的无文件.将图像加载到GIMP中.将其剪裁到一个合理的大小,显示相对均的纹理.选择过器>地图>使无.其他照片编辑器通常会有类似的操作.以合适的文件名保存图像. -
Load the image into GIMP. Crop it to a reasonable size showing a relatively uniform texture.
-
Add a material and a texture using the image. Adjust the settings as needed to look good.
::根据图片添加材料和纹理.根据需要调整设置以使图片看起来更好. -
If you are following my steps, I have put all the textures in this article for you to copy if you wish. Click on the thumbnail image and go to the Wiki page from which you can download.
::您可以在此处下载所有图案, 按一下缩略图, 进入下载页面.
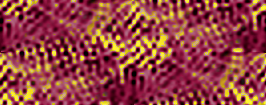
You can just select a rectangular swatch of skin from the picture and use GIMP to make it seamless. But Komodo Dragons are a depressing color. For a fantasy creature we need a brighter skin! So you can play with GIMP Colorizer until you have a suitably colored swatch. I used red and gold, but use your imagination! This becomes the first material and texture for the dragon's body. It will probably be necessary to repeat the image several times in both the X and Y directions. I used X:6 and Y:2 in this particular case.
::你可以从图片中选择一个矩形的皮肤样本,然后用GIMP使其无.但是鱼龙是令人丧的颜色.对于一个幻想生物,我们需要更明亮的皮肤!所以你可以玩GIMP色化器,直到你有一个合适的颜色样本.我用红色和金色,但用你的想象力!这成为龙的身体的第一个材料和质地.这可能需要在X和Y方向重复图像几次.我在这个特定的情况下使用X:6和Y:2.
Adding the Eyes
::添加眼睛
The dragon needs suitably scary eyes. Hopefully you have already modeled eyes for the
Procedural Eyeball
tutorial. I chose the cat's eye. In
Some Assembly Required
we learned how to append a file. Append the Cat's Eye, and then work on the color textures until you have a suitably scary dragon eye. Then duplicate it and put one eye on each side of the dragon's head. I joined the eyes to the body, but you can also just parent them if you are careful. You will notice in later renderings that I kept playing with the eye color and position.
::龙需要适当的可怕的眼睛.希望你已经为程序眼球教程建模了眼睛.我选择了猫眼.在一些组装要求中,我们学会了如何添加文件.添加猫眼,然后在颜色纹理上工作,直到你有一个适当可怕的龙眼.然后复制它,把一个眼睛放在龙头的每一侧.我把眼睛连接到身体,但如果你小心的话,你也可以把它们养育.你会注意到在后来的染中,我一直在玩眼睛的颜色和位置.
A Dragon Needs Teeth and Claws
::龙需要牙和爪子

Using the technique from
Multiple Materials per Object
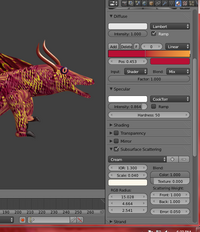
, isolate the claws and give them a nice shiny black material. Too much Specularity will make the claws look like plastic, too little will make them dull and uninteresting. I added just a little bit of Mirror also. It will be something to experiment with until you get the look you like. Click on the picture to enlarge it and see the setting I settled on. Remember that you have to select the area of the mesh and ASSIGN it to the material or you will wind up with a dragon that is black all over! (That is the voice of sad experience speaking).
::通过每件物体多种材料的技术,将爪子分离出来,并给它们一个漂亮的闪亮的黑色材料.太多的光谱会使爪子看起来像塑料,太少的光谱会让它们变得无趣和无趣.我也添加了一些镜子.它将是你尝试的东西,直到你得到你喜欢的外观.点击图片以放大它,并看到我设置的设置.请记住,你必须选择网状的区域并将其分配给材料,否则你将会得到一个全黑的龙! (这是悲伤的经验的声音说话).
A dragon needs teeth. A lot of teeth! Modeling all those teeth would be a big job. Fortunately we learned how to use array modifiers in
Building a House
. Add a cone, scale it down very small, and extrude some more parts so you can shape it into a nice curve. When you have a beautifully sharp tooth, add the Array modifier and make it into a whole row of sharp teeth. Then duplicate the whole thing three times, rotate it around as needed, and you will have four rows of teeth, enough for both jaws. This is why we left the mouth open when we made the original model.
::龙需要牙. 很多牙! 建模所有这些牙将是一个大任务. 幸运的是,我们学会了如何在"建房"中使用阵列修饰器. 添加一个圆,缩小它非常小,并挤出一些更多的部分,这样你就可以将它塑造成一个漂亮的曲线. 当你有一个美丽的尖的牙,添加阵列修饰器并使它成一整排尖的牙. 然后复制整个东西三次,按需要旋转,你将有四排牙,足够两个下巴. 这就是为什么我们在制作原始模型时留下了开放的嘴.
Horns, a Crest, and Nostrils
::角,和鼻孔
Lets give the beast some horns. Here we can use what we learned in
Deforming Meshes using the Curve Modifier
to make some gracefully curved horns. Just as in that lesson, add a cone and extrude segments to give a lot of vertices. Then create your Bézier Curve and set it as a modifier to the horn mesh. Properly done your horn will mold itself to the shape of the curve. Duplicate it and rotate it to fit the other side of the head and put them in place.
::让我们给这个野兽一些角. 在这里我们可以使用我们在"使用曲线修改器变形网"中学到的东西来制作一些优雅的曲线角. 就像在那个课程中一样,添加一个形和挤出部分以获得很多顶点. 然后创建您的贝齐尔曲线并将其作为角网的修改器. 正确完成,您的角将自成曲线的形状. 重复它并旋转它以适应头部的另一侧并将它们放在位.
Animal horns are some of the most beautiful structures in nature. We should make a particularly pretty material for them. We can use the blending colorband as in the tutorial
Basic Carpet Texture
, updating it a bit for 2.69, to give the horns a nice color appearance. Then add
Subsurface Scattering
as taught in that tutorial, with a lot of experimenting, until you get a really beautiful appearance. The settings I used are in the picture but it is fun to try different things.
::动物的角是自然界中最美丽的结构之一. 我们应该为它们做出特别漂亮的材料. 我们可以像教程中一样使用混合色带基本地毯纹理, 更新它为2.69, 给角一个漂亮的颜色外观. 然后添加在教程中教导的表面散射, 经过大量的实验, 直到你得到一个非常漂亮的外观. 我使用的设置是在图片中, 但尝试不同的东西很有趣.
An impressive crest should dominate the dragon's back. I found a picture of a basilisk lizard and used it as a background model for the crest. The Crest texture was produced in GIMP exactly the same way as the dragon skin texture.
::龙背上应该有一种令人印象深刻的战斗.我找到了一个的图片,并用它作为战斗的背景模型.战斗的纹理在GIMP中完全与龙皮肤纹理相同.
Reptile nostrils are sort of nondescript, so lets make some nice nostrils like a snorting bull might have. You can use the technique from
Spin a goblet
to model one nostril, then duplicate it, rotate the pair until they look fierce, and give them a nice color like the dark red brown I picked. Then put them in place and parent them to the body.
::爬行动物的鼻孔是不具备任何特征的,所以让我们做一些漂亮的鼻孔,像鼻的牛一样.你可以使用"旋转杯子"的技术来模拟一个鼻孔,然后复制它,旋转一对,直到它们看起来很凶猛,并给它们一个漂亮的颜色,像我选择的深红棕色.然后把它们放在原地,并将它们与身体相结合.
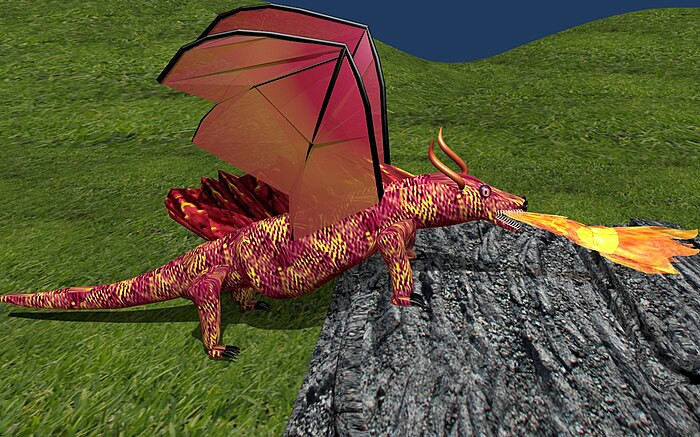
Now you can render your dragon and see the basic body shape, but something is missing. What is it?
::现在你可以染你的龙, 看到基本的身体形状,
Giving the Dragon Wings
::给龙翼的
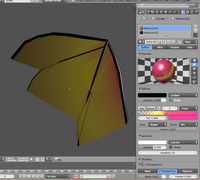
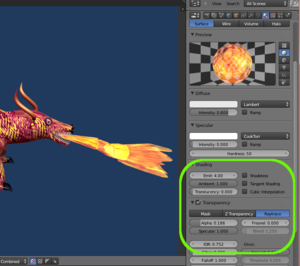
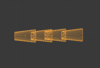
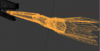
The wings were the hardest part, because we have not had many tutorials in this series that dealt with the problems involved. I started with a cylinder object and went from there, joining other cylinders to it, and then selecting edges and using F to create faces. There may be other better ways to do it. I wanted the wing sail parts to be semi transparent and give an appearance of shimmering colors. Experimenting with the transparency and the materials as seen in the screenshot gave me some I liked pretty well. I am not completely satisfied with it but perhaps it is the best that can be done with the tools we have so far learned. Joining the wings to the body seemed to produce some distortions so I just parented both of them to the body object.
::机翼是最困难的部分,因为我们在这个系列中没有很多教程来处理涉及的问题.我从一个圆柱体开始,然后从那里开始,将其他圆柱体与它连接,然后选择边缘并使用F来创建面孔.可能还有其他更好的方法来做到这一点.我希望机翼帆部分是半透明的,并呈现闪闪发光的颜色.在截图中看到的透明度和材料的实验给了我一些我很喜欢.我对此并不完全满意,但也许这是我们迄今为止所学到的工具所能做的最好的事情.将机翼与机体连接起来似乎会产生一些扭曲,所以我只是将它们两者与机体对立.
Now there is just one more thing that a perfect dragon needs.
::现在,完美的龙还需要一件事.
FIRE!
::现在我们要开火!
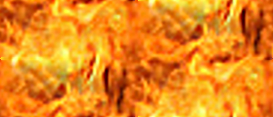
Everybody knows that dragons breathe fire. It seems that there are many different ways to do flames in Blender. However, I am attempting to use methods covered so far in this tutorial series, so I wanted to experiment and see what could be done with just what we have learned. I came up with something reasonably close to flame breath using basic techniques. I started with a series of cylinder objects, scaled at one end until they are almost cones, and then stacking them inside each other. I used the proportional editing that we learned about in
Mountains Out Of Molehills
to pull and stretch into some more or less random shapes. I found the flame picture and turned it into a seamless material swatch. Then I wrapped it around my cones and began playing with the settings for transparency, and added an Emit setting just to see how it looked. (If you want to jump ahead refer to
Making Fire
in the next section of this series.)
::每个人都知道龙会喷出火. 似乎在Blender中有很多不同的方法来燃烧火焰. 然而,我试图使用本教程中所述的方法,所以我想尝试,看看我们所学到的东西可以做些什么. 我用基本技术想出了一些相当接近火焰的东西. 我从一系列圆柱体开始,在一端缩小到几乎是形,然后将它们堆叠在一起. 我使用了我们在Mountains Out Of Molehills中学到的比例编辑来拉伸和拉伸到一些或多或少的随机形状. 我找到了火焰图片并将其变成了一个无的材料样本. 然后我把它包裹在我的形周围,并开始玩透明度设置,并添加一个Emit设置,看看它是如何看起来的. (
Ground to Stand on
::坚持自己的立场
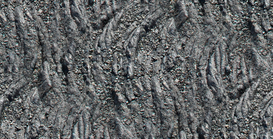
Now it is time to complete the scene by giving him something to stand on. Since his front feet are raised, put in a sort of lava flow for him. That seems appropriate for a dragon. Try Adding a series of cubes. Stack them up and pull them out of shape with proportional editing. Add a subsurf modifier, and then the set the lava rock as an image texture. Again I made a seamless material out of a photo.
::现在是时候让他站立完成场景了. 因为他的前脚被抬高了, 给他一个岩流. 这似乎适合于龙. 试着添加一系列的立方体. 堆叠它们, 通过比例编辑把它们拉出形状. 添加一个地下修饰器, 然后将岩作为图像纹理. 我再次用照片制作了一个无的材料.
Then create a plane and again use the proportional editor to make some nice hills. A seamless green grass texture repeated multiple times completed the ground.
::接着再用比例编辑器创建一个平面, 制作一些漂亮的山丘. 一个无的绿色草地纹理重复多次完成了地面.
Lighting
::照明
So far the lighting has just been the default point light. I think it is a bit more dramatic to use the Sun style of lamp. As we learned in
Light a Silver Goblet
go to
Add>Lamp>Sun
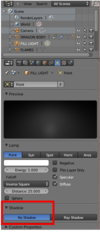
and place a sun type lamp rather high in the sky. You will notice that now you get two overlapping shadows, one from the Sun and one from the default point lamp. You could just delete the point lamp, but, to advance beyond what has already been covered, it is useful as fill lighting. You can select the point lamp, go to the properties panel and click on the light icon
![]() . Scroll down to Shadow and click No Shadow and the point light becomes a fill light. Setting the horizon color in the world panel
. Scroll down to Shadow and click No Shadow and the point light becomes a fill light. Setting the horizon color in the world panel
![]() is the last step to produce this scene.
is the last step to produce this scene.
::现在,光源是默认的点灯. 我认为使用太阳灯的风格更为戏剧化. 正如我们在"点亮银杯"中所学到的,进入"添加>灯>太阳"并将太阳灯放置在天空中. 你会注意到现在你得到两个重叠的阴影,一个来自太阳,一个来自默认的点灯. 你只需要删除点灯,但要超越已经覆盖的,它是充满照明的有用. 你可以选择点灯,进入属性面板并点击灯图标. 滚动到"影子"和"没有影子",点击点灯成为充满灯. 在世界面板中设置地平线颜色是制作这个场景的最后一步.
THE FINAL RESULT
::结果
I think it nicely combines pretty much all I have learned about Blender so far in the tutorial! If you want to try your hand at a project, it is not as hard as you might think. You and I have really learned a lot by going through the first two sections of
Blender 3D:Noob to Pro
. I thank all the authors who have worked hard to bring us to this point.
::我认为它很好地结合了我在教程中学到的所有关于Blender的知识!如果你想尝试一项项目,它并不像你想象的那么难.你和我通过Blender 3D:Noob to Pro的前两个部分学到了很多.我感谢所有努力使我们达到这一点的作者.
I challenge you to show off what you can do with your newly acquired knowledge and put your finished work up here. It will probably be a lot better than mine.
::我挑战你用你刚刚获得的知识来展示你能做什么,
Noob Project No.02 - Space Dragon in Space
::无人项目02号 - - 太空中的太空龙
First off, thanks for creating this page! What a wonderful idea to include all the good readers in a final project! This is what openness is all about, and this wiki platform is the perfect place to be doing it. Also, huge thanks to whoever originally wrote this tutorial. Whoever you are, nameless stranger, you're doing excellent work.
::首先,谢谢你创建了这个页面! 收录所有好读者的最后一个项目真是个好主意! 这就是开放的意义, 这个wiki平台是做这件事的完美场所. 还有,非常感谢原创编写这篇教程的人. 不管你是谁,无名的陌生人, 你做得很好.

Moving on, I knew I wanted my dragon to live in space and shoot lasers, so the first thing I did was sketch him out so I had some sort of plan before beginning the tedious busy-work.
::我知道我想要我的龙生活在太空中, 射击激光, 所以我做的第一件事就是画出他的样子,
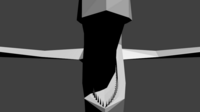
I think this is technically called a "wyvern." Anyway, with this general idea in mind, I began extruding a cube to bound out the basic shape, keeping in mind how it's internal skeleton would look and behave (if dragons were real of course) The wing hand and knuckle bits were kind of tricky. For those, I extruded a long rectangle for the arm, and added a few loop-cuts at the end, which i extruded into fingers. Tricky and finicky.
::无论如何,我开始挤出一个立方体来界定基本形状,同时也考虑到它的内部骨架的外观和行为 (如果龙是真实的,当然) 翼手和手指节的部分有点棘手. 对于这些,我挤出了一个长长的矩形为手臂,并添加了一些环切割,我挤出成手指. 棘手和细.
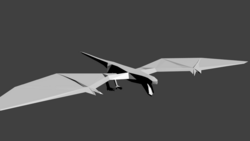
There's probably a better way to do this. While editing, I recommend using a mirror modifier, but be careful of vertices on the negative side of your mirror. Best thing to do would be cut your model in half along its axis of symmetry and then apply the mirror. Otherwise, vertices can show up on the positive side where you don't notice them until you're almost done modeling. Have fun cleaning that up... I did.
Select > Select All by Trait >
helps a lot with this, and as always, remember to remove doubles every now and then! After several hours, here's the basic, blocky model of a wyvern I made. Next I made some teeth. Cone with 3 verts > Curve modifier > Array x 37
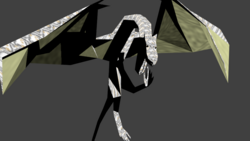
::编辑时,我建议使用镜像修改器,但请注意镜子负面的顶点. 最好是将模型沿对称轴切成两半,然后应用镜子. 否则,顶点可能会出现在正面,直到你几乎完成模拟才会注意到它们. 很高兴清理...我做了. 选择> 选择所有特征> 有助于这,并且像往常一样,记住时不时删除双重物! 几个小时后,这是我制作的基本的,块状的wyvern模型. 接下来我做了一些牙. 有3个顶点> 曲线修改器> 阵列> 37 x 37
Now, those teeth look a little small, and I suppose 37 rows of teeth is a little much for anyone, even if their mouth is 4.76 meters long. Next time, I'll probably give him less teeth, and just make them all a little bigger. I wanted to make a U/V map and draw some real nice textures on this thing, but we hadn't gotten there in the tutorial yet, and I figured I'd follow the precedent. Besides, I don't properly know how to do one anyway. So I opened up the GIMP and drew some neat looking scale textures. Actually, first, I looked up scales on Wikipedia (and learned that scales grow from the epidermis and are weaker than
scutes
, which grow from the deeper dermis, and so are more durable, among other differences. It's cool stuff, for sure.) So I pulled up some images of scutes from the internet, and I got to work. I made my textures super low resolution (32x32 I think) cause I wanted that retro/late-90s rendering look. Haven't you heard? It's all the rage these days! It also helps with rendering times on my craptop computer. Just check out this
YouTube playlist
I was listening to while I made it.
::现在,这些牙看起来有点小,我猜 37 排牙对任何人都来说都不够,即使他们的嘴长 4.76 米. 下次,我可能会给他少些牙,让它们都变大一点. 我想制作一个 U/V 图,在这个东西上画一些很好的纹理,但我们还没有到达那个教程,我想我会按照先例. 此外,我不太知道如何做. 所以我打开了 GIMP,画了一些看起来很整洁的纹理. 事实上,首先,我在维基百科上查看了 (并发现从表皮中生长,比更薄弱,从更深的皮肤中生长,所以更耐用,除其他差异. 这很酷,当然.) 所以我从互联网上抽取了一些图片,

Of course that strange position he's in looks uncomfortable, not to mention it would probably make for a unexciting rendering. So I gave him some bones for him to orient into a more natural position with. The toughest thing about making an armature has got to be symmetry. At its very best, it's tedious. At its worst, it's torture. I know there's a way to edit armatures with a mirror modifier in blender, but I couldn't find it, and anyway, I finished up alright. A thing to note: If you've gotten pretty far along and you find you need to delete a bone in the middle of your armature, you can rejoin the ends by selecting them and hitting
Ctrl + P > Connected
To keep your armature in the same position, reposition the ends with cursor to selected then selected to cursor.
::显然,他处于这种奇怪的位置看起来很不舒服,更不用说它可能会使染变得不太令人兴奋.所以我给了他一些骨头,让他以更自然的位置定位.制作具最困难的是对称.最好的时候,它很乏味.最坏的时候,它是折磨.我知道有办法在混合器中使用镜像修改器来编辑具,但我找不到,不管怎样,我完成了.值得注意的是:如果你已经走得很远,你发现你需要删除具中间的骨头,你可以通过选择它们并按Ctr + P > 连接重新连接端子,以保持具在相同的位置,重新定位光标以选择光标结束,然后选择光标.
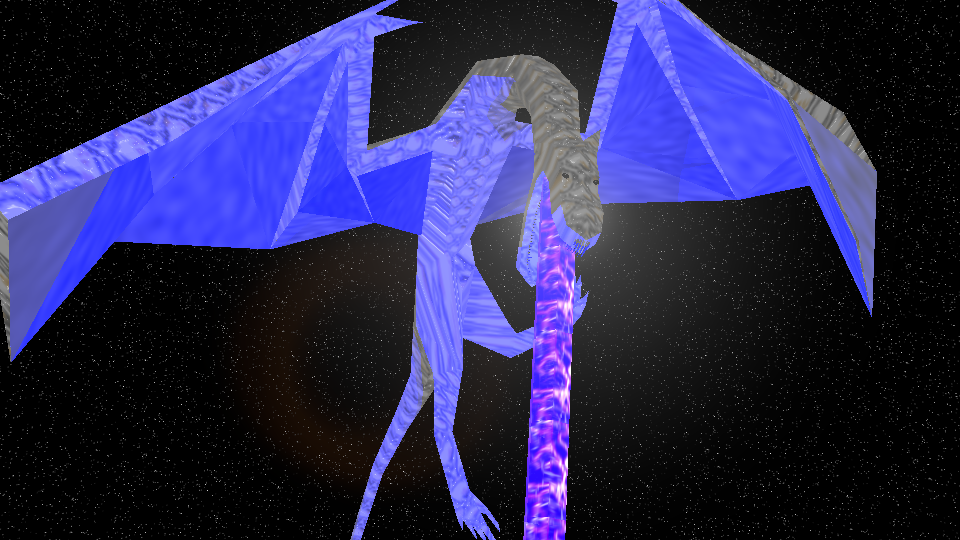
Next, I wanted him to shoot lasers out of his mouth instead of fire, cause ya know... He's in space. So I opened up the GIMP again and made a texture to wrap around a tube that would be the beam.
::接下来,我希望他用嘴里发射激光而不是火,因为你知道...他在太空中.

Lots of lightning and sparks everywhere... It was cool. The beam itself was a tube with a blue material on it—full emit, can't receive shadows, slightly transparent, and full translucency. I slapped my texture on and put the tube in the beast's mouth. I duplicated that tube with
Alt + D
and shrunk it a little on its local !Z axis (
Shift + D
) so it would shine through. Inside the dragon's mouth and down the length of the tube i stuck a few point lights with the energy turned up to 11.
::很多闪电和火花在任何地方...很酷.光束本身是一个蓝色材料的管完全发射,不能接收阴影,略微透明,和完全透光.我拍了我的纹理,把管放在野兽的嘴里.我复制了管用Alt + D和缩小它在它的当地的!Z轴 (Shift + D) 这样它会发光.龙的嘴里和下长的管我插了几个点灯的能量变成了11.
Actually it only goes to 10. Maybe those guys at blender should fix that.
::实际上只有10个,也许那些混机的家伙应该修复.
To get the beautiful starfield you see in the background I went into the GIMP, filters > noise > hurl (what a great name for this thing btw), and desaturated the picture with colors > desaturate. Yep. Simple as that. There's probably something you can do right from Blender with procedural textures, but either way, sky texture! getting it to show up in the view took me some searching. I didn't remember how we'd done it from earlier in the tutorial. Anyway that sort of repetition helps the memory.
::为了得到你在背景看到的美丽的星球场,我进入了GIMP,过器>噪音> (这对这个东西来说真是个好名字).然后用颜色>不和色去和图片.是的.简单的.你可能可以直接从Blender中用程序纹理来做一些事情,但无论如何,天空纹理!让它显示在视图中,我需要一些搜索.我不记得我们从教程中早些时候如何做.不管怎样,这种重复有助于记忆.
AAAAAAAAAAHHHH!!!
::没有人会说话.