Blender 3D:零基础到专业级-单元3:拓展视野
Section outline
-
Blender’s UV/Image Editor window serves a number of related purposes:
::混合器的UV/图像编辑器窗口有多个相关目的:-
It is a place to view rendered images, and save them to files.
::它们可以显示染图像,并将其保存到文件中. -
It is a place to view and edit images being used as textures.
::它是一个视图和编辑图像的位置, -
It is a place to perform
UV mapping
of meshes to texture images.
::这是一个将网格进行紫外线映射到图像纹理的场所.
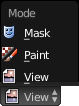
In the window header, you will see “View” and “Image” menus, followed by a menu for choosing which image to view. The rest of the window header varies depending on your choice from this last menu.
::在窗口头部,您将看到"查看"和"图像"菜单,然后选择要查看的图像.窗口头部的其余部分取决于您在最后一个菜单中的选择.Viewing Render Results
::查看染结果
Here is what the variable part of the window header looks like when you choose the special “Render Result” entry in the image-selection menu. The next menu, showing the word “View”, serves no useful purpose in this case (it is only applicable to editable images, not the render result). Next to that is a Slot menu, allowing you to select from any of 8 numbered slots. Each slot can hold a separate Render Result image. This is handy for trying out different render settings (e.g. quality etc), and quickly flip between them for comparison. You can also use the keyboard shortcuts 1KEY .. 8KEY to switch slots. When you perform a render, the generated image is put into the slot you are currently viewing in the UV/Image Editor.
::在图像选择菜单中选择特殊的"Render Result"项时,窗口头部的可变部分是这样的.下一个菜单显示"View"这个词在这种情况下没有任何有用的用途 (它只适用于可编辑的图像,而不是染结果).旁边是一个Slot菜单,允许您从任何8个编号的槽中进行选择.每个槽可以保存一个单独的染结果图像.这对于尝试不同的染设置 (例如质量等) 很方便,并快速翻转它们进行比较.您还可以使用键盘快捷键1KEY .. 8KEY切换槽.当您执行染时,生成的图像将被放入您正在UV/图像编辑器中查看的槽中.The next two menus, showing “RenderLayer” and “Combined” in the above screenshot, allow you to view different render layers and render passes, if you have more than one of these configured in the render settings, as well as the final compositor result.
::接下来的两个菜单,在上图显示的RenderLayer和Combined,允许您查看不同的染层和染通道,如果您在染设置中配置了多个染层,以及最终的作曲器结果.The rightmost group of four icons make a further breakdown of the image into RGB channels with/without alpha transparency layer, alpha on its own, and Z (depth) buffer on its own. Alpha transparency only matters if you are rendering a transparent background in place of the sky, as discussed later .
::最右边的四个图标组将图像进一步分解为具有/没有α透明层的RGB频道,单独的α,单独的Z (深度) 缓冲.如下所述,如果您正在染透明背景而不是天空,则α透明度才重要.
What you see is what you save. When saving an image to a file, the saved image will correspond—choice of slot, layer and pass—to what you are currently viewing on-screen.
::您所看到的就是您所保存的. 当将图像保存到文件中时, 保存的图像将与您正在屏幕上查看的内容相匹配.Viewing/Editing Texture Images
::查看/编辑纹理图像
Here is what the variable part of the window header looks like when you select some other image, or create a new one. Now the editing-context menu
 becomes useful: selecting the “Paint” item lets you paint on the image.
::当您选择其他图像或创建新图像时,窗口头部的可变部分是这样的.现在编辑上下文菜单变得有用:选择"绘画"项可以让您在图像上绘制.Note the rightmost group of icons in the header has shrunk slightly: there is no more Z-buffer option, though the alpha-related options still exist.
::注意,标题中的最右边的图标组略微缩小了:没有更多的Z缓冲区选项,尽管与alpha相关的选项仍然存在.UV Mapping
::超紫外线映射
Here is what the variable part of the window header looks like when you select a texture image, and go into Edit mode on a mesh in the 3D View window.
::在3D视图窗口中, 在网格上进入编辑模式.
-
It is a place to view rendered images, and save them to files.
-
In 2D drawing programs, you may be familiar with the concept of grouping objects together, so that they can be manipulated and transformed as an indivisible whole.
::对于2D绘图程序, 你可能已经熟悉对象组合的概念,Blender can achieve a roughly similar effect through its concept of parenting one object to another. (Blender also has a concept called “grouping”, but that serves an entirely different purpose, which will not be discussed here, so don’t be confused.)
::通过将一个对象与另一个对象进行育儿的概念,Blender也可以实现类似的效果. (Blender也有一个称为"分组"的概念,但它有完全不同的目的,这里不会讨论,所以不要混).Parenting and Unparenting
::养育孩子和没有养育孩子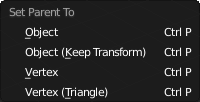
To parent one object to another is simple: in object mode, select the to-be-child object(s), then select the to-be-parent object, then press CTRL + P to bring up the “Set Parent To” menu. The options in the menu have the following meanings:
::将一个对象与另一个对象关联起来很简单:在对象模式中,选择将会是子对象 (),然后选择将会是父对象,然后按Ctrl+P来打开"设置父对象"菜单.菜单中的选项有以下含义:-
Object: set the parent of the rest of the selection to the active (last-selected) object, clearing any existing parent relationships the new-children-to-be may have had. Any objects that were previously parented are reset to their original transformations before that previous parenting.
::对象:将选择的其余部分的父设置为主动 (最后选择的) 对象,清除新子可能拥有的任何现有父关系.任何以前被父设置的对象都会被重置到之前的原始转换. -
Object (Keep Transform): similar to the above, except the children keep the transformations from any previous parenting they may have had.
::目标 (保持转化):类似于上述,但孩子们保留了他们可能经历过的任何先前的育儿的转化. -
Vertex: this allows you to parent a child to a single, currently-selected vertex in the parent (which must be a mesh). You can go into Edit mode on the parent mesh to make the selection before using this option. The child will then track the movements of just that vertex, not the entire object.
::顶点:这允许你将子向父中的单个,当前选择的顶点 (必须是网格).你可以在使用此选项之前进入父网格的编辑模式进行选择.然后子将跟踪仅仅该顶点的移动,而不是整个对象. -
Vertex (triangle): here 3 vertices are selected in the parent mesh. The child tracks, not just their translations, but also their relative rotations as well.
::顶点 (三角形):在此,在父网格中选择了3个顶点.子网不仅跟踪它们的转换,还跟踪它们的相对旋转.
When viewing your scene in Object mode, you will see black dashed lines connecting child objects to their parents. Try moving, rotating or scaling just the parent object, and you can see how the same transformation is automatically applied to its children as well.
::在Object模式下观看场景时,您会看到连接子对象与其父对象的黑色点线.尝试移动,旋转或缩放父对象,您可以看到相同的转换如何自动应用于子对象.To parent multiple children at once to a common parent , select all the child objects in turn, then last of all select the parent object. Now when you do CTRL + P , all the objects selected (except the last one) become children of the last one.
::为了同时将多个子对象与一个共同的子对象关联起来,请轮流选择所有子对象,然后最后选择父对象.现在当你用CTRL+P键键键入,所有选择的对象 (除了最后一个) 都会成为最后一个对象的子对象.A parent of objects may in turn be a child of yet another object; any transformation of its parent will automatically be passed on to it and all its children, and their children, and so on.
::一个对象的父子也可能是另一个对象的子子;其父子的任何转换都会自动传递给它及其子女,以及他们的子女等等.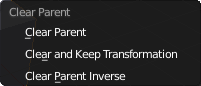
To remove a parent relationship: select the child in Object mode, and press ALT + P to bring up the clear-parent menu. The options here are:
::要删除父关系:在对象模式中选择子,然后按ALT+P以显示清除父菜单. 这里的选项是:-
Clear Parent: remove the parent/child relationship, and reset the child to the original transformation it had before the parenting.
::清除父母:删除父母与孩子的关系,并将孩子重置到它在父母之前的原始转变. -
Clear and Keep Transformation: remove the parent/child relationship, but the child keeps its current transformation as a result of the parenting.
::清除并保持转变:删除父母/孩子关系,但孩子会保留其当前的转变作为父母的结果. -
Clear Parent Inverse: this doesn’t actually clear the parent/child relationship, but it sets the transformation of the child relative to the parent to the same as the transformation the child had on its own before it was parented.
::清除父母逆向:这实际上并没有清除父母/孩子关系,但它将孩子相对于父母的转变设置为孩子在被父母之前本身的转变.
Clear Parent Inverse Clarified
::清晰的父母反向解释Normally, when a parent relationship is set up, if the parent has already had an object transformation applied, the child does not immediately inherit that. Instead, it only picks up subsequent changes to the parent’s object transformation. What happens is that, at the time the parent relationship is set up, the inverse of the current parent object transformation is calculated and henceforth applied before passing the parent transformation onto the child. This cancels out the initial transformation, leaving the child where it is to start with. This inverse is not recomputed when the parent object is subsequently moved or subject to other object transformations, so the child follows along thereafter.
::通常,当建立父关系时,如果父对象已经应用了对象转换,子对象不会立即继承.相反,它只会接收父对象转换的后续变化.发生的事情是,在父关系建立时,计算当前父对象转换的逆值,然后在将父转换传递给子之前应用.这取消了初始转换,使子在它开始的地方.当父对象随后被移动或受到其他对象转换时,这个逆值不会被重新计算,因此子随之而去.The “Clear Parent Inverse” function sets this inverse transformation to the identity transformation, so the child picks up the full parent object transformation.
::函数"清除父逆"将这个逆转换设置为身份转换,因此子取代了整个父对象转换.

The shortcut CTRL + SHIFT + P is equivalent to setting up a parent relationship, followed by Clear Parent Inverse.
::快捷键CTRL+SHIFT+P相当于设置一个父关系,其次是清除父反向.Lock Up Your Children!
::关闭你的孩子!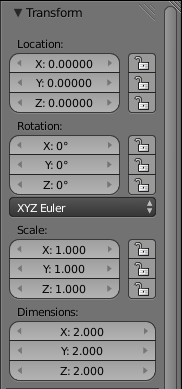
In the Properties shelf at the right of the 3D view (you can toggle its visibility with N ), you will see at the top the Transform panel. This shows the overall object transformation (translation, rotation, scaling), but note also the padlock icons next to the transformation fields: clicking each one closes its padlock, locking the corresponding field against further changes, including changes made with the usual object-transformation tools in the 3D view . (If you click a closed padlock, it will open again and remove the lock.)
::在3D视图右侧的属性架 (您可以使用N 切换其可见性),您将在顶部看到转换面板. 这显示了整体对象转换 (转换,旋转,缩放),但也注意转换字段旁边的挂图标:单击每个关闭其挂,锁定相应字段以防止进一步的更改,包括在3D视图中使用通常的对象转换工具进行的更改. (如果您单击关闭一个挂,它将再次打开并删除锁.)This can be useful for a child object: if its object transforms are locked, it will still follow changes to transformations on its parent, but it cannot have its transformation changed directly. This can prevent accidents when manipulating an “object” which is actually made up of multiple Blender objects: parent them all to a common root object (e.g. an Empty), and then lock them all, apart from the root object, and so they will transform together by manipulating just the root object, and cannot (accidentally) be separated.
::这对于子对象来说可能很有用:如果对象的转换被锁定,它仍然会跟随对其父对象的转换的变化,但它不能直接改变它的转换.这可以防止操作实际上由多个混合器对象组成的"对象"时发生事故:将它们全部转换为一个共同的根对象 (例如空),然后将它们锁定,除了根对象,因此它们将通过仅仅操作根对象而一起转换,并且不能 (意外地) 分开.For example, you might construct a car with separate objects for the doors and wheels; these might be left free to rotate (about their hinges and axles respectively), but are otherwise locked in position relative to the car body.
::例如,你可以用单独的门和轮的物体来构建汽车;这些可能会自由旋转 (分别是关于链和轴),但与汽车车身相对而言则被锁定在位置.Example: Camera Pan
::举例:摄像机板Imagine you want to make a movie where the camera does a 360° pan right around an object. We’ll leave the details of how to set up an animation for later, but for now let’s just consider how to set up the camera movement.
::设想你想拍一部电影, 摄像机在一个物体周围进行360度旋转. 我们将为后面详细介绍如何设置动画,Start with a new default Blender document. With the 3D cursor at its default location (at the centre), add a new Empty object. It should end up inside the cube, so it won’t be visible; switch Z to wireframe view, and it should be easier to see.
::开始使用一个新的默认的Blender文档. 在3D光标默认位置 (中心),添加一个新的空物体. 它应该在立方体内,所以它不会被看到;切换Z到线框视图,它应该更容易看到.Select RMB the camera; then select SHIFT + RMB the Empty as well; now CTRL + P parent the camera to the Empty.
::选择RMB相机;然后选择SHIFT+RMB空;现在CTRL+P对相机的父为空.Now select RMB just the Empty, and try R otating it: notice how the camera follows along? For added fun, switch to camera view NUM0 (make sure the Empty is still the only thing selected). Now try rotating the Empty: it should look like the cube is rotating in the opposite direction, when it is really the camera moving around it.
::现在选择RMB只是空,并尝试Rotating它:注意如何摄像头跟随?为了增加乐趣,切换到摄像头视图NUM0 (确保空仍然是唯一的选择).现在尝试旋转空:它应该看起来像立方体在逆向旋转,当它是真正的摄像头在它周围移动.
-
Object: set the parent of the rest of the selection to the active (last-selected) object, clearing any existing parent relationships the new-children-to-be may have had. Any objects that were previously parented are reset to their original transformations before that previous parenting.